Make Your Own Gratitude Jar
Making a gratitude jar can turn your family’s arts-n-crafts time into a fun mindfulness activity to help your kids develop an attitude for gratitude! Another bonus? You can likely do this activity with craft supplies you already have at home! Read on to learn how to make your own family gratitude jar.
Spread the fun by sharing your decorated jar on social media and tag @Meant2Prevent!
Read below for details on making your own Gratitude Jar, and print out the template!
In This Post
- What’s a Gratitude Jar
- Why is Gratitude Important
- How Do you Use a Gratitude Jar
- How to Make a Gratitude Jar
- Writing Prompts for Gratitudes
- Printable: Steps and Gratitude Slip template
What’s a Gratitude Jar?
A gratitude jar is a container that holds reminders and memories of things that you and your family are thankful for.
Gratitude jars can help your family to be appreciative and mindful of the good things that happen day-to-day, and they can teach your kids the importance of reflecting on positive experiences.
Why is Gratitude Important?
Gratitude is a subjective feeling of wonder and thankfulness. It is a positive emotion that helps us notice and appreciate what we have and pay more attention to the small positives that happen every day. Research has found that staying grateful can help improve mental health for both adults and children, and we often feel happier after expressing and sharing gratitude!
Being grateful doesn’t just happen, it is a habit that is built through practice! A gratitude jar can be a fun way your family can practice this type of mindfulness together.


How Do You Use A Gratitude Jar?
After making your gratitude jar by following the steps below, choose a regular time interval (it could be every day, or once per week) for your family to write down things that they are grateful for, or even happy memories that happened throughout that day or week. Download our printable handout that includes the steps for building your jar, and a template for your slips. There are also some samples and prompts to get you started below. As you add more slips, the jar will fill with reminders of the good things in your family’s life.
Each week, you can read some gratitudes from your jar to help reflect on happy memories as a family. It can also be helpful and uplifting to read a few if you or your child needs a pick-me-up after a challenging day.
Are you ready? Let’s get started!
How To Make a Gratitude Jar
Supplies:
- 1 large jar (glass or plastic) or box*
- Art supplies such as ribbon, stickers, buttons, tissue paper
- Scissors
- Pens, crayons, and/or markers
- Glue – white glue, hot glue gun, or tape**
- Paper (for your gratitudes) – choose coloured paper, or print out our template!
*You can also choose to have each member of your family decorate their own personal gratitude jar
**Be careful when using hot glue with children. Parental supervision is recommended.
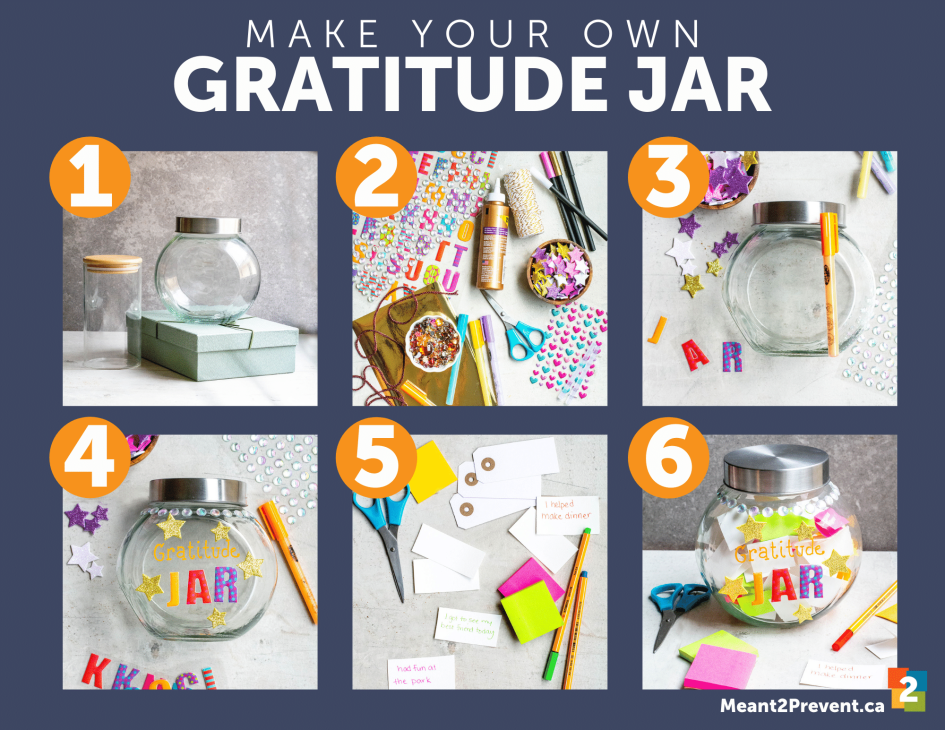
Directions:

- Find a container (or multiple!). You can often find a jar or box around your house by using an empty food container, mason jar, shoe box, or cardboard box. If you have younger children, consider using a plastic container or a box as these won’t break if accidentally dropped. You can also find some great containers at to your local dollar store!

- Get creative. Use any craft supplies you have around the house to decorate your jar. Things like ribbon, yarn, tissue paper, glitter, buttons, and stickers can help add colour and personality. Use glue or tape to attach items to your jar. Remember to supervise young children if using a hot glue gun.

- Make your gratitude slips. Cut construction paper or printer paper into rectangles to use to write your gratitudes. You can also print out our gratitude slip template which has some helpful prompts to get you started writing your gratitudes.

- Schedule time as a family. Choose a regular time for your family to write down their gratitudes and place them in your jar. Pick a time that works best for your family’s routine. After dinner, or before bed can work well, just try to do it together as a family. This is an important step because it allows you to model the practice for your kids and it helps them understand how to use the gratitude jar.

- Create mindfulness habits. Choose when your family will read some gratitudes. Try once a week, or whenever your family needs a pick-me-up! This is a great time to re-live those happy memories, and reflect on all the positives, and good things that have happened together.
Writing Prompts for Gratitudes
- I am grateful for __________ because _________
- I feel thankful for __________ because _________
- I appreciate __________ because _________
- Today was special because _________
- Something I really like about my family is _____________
- I felt happy today when ________
- Something that makes me smile is _________________
- I was proud of myself today because ________________
- My favourite memory from today was ___________
- Something I look forward to every day is ____________


